Autoware Setup and Demo using Docker
Autoware, which is an open source software for autonomous driving, provides Docker images and you can easily install Autoware by using one of these Docker images.
In this article, we will show you how to set up Autoware and run demonstration using Docker.
Autoware
Autoware is an open-source software for self-driving vehicles.
For details, please visit the following site.
- Web: https://autoware.ai/
- GitHub: https://github.com/CPFL/Autoware
- Docker Hub: https://hub.docker.com/r/autoware/autoware/
Autoware Setup using Docker
Prerequisites
- Ubuntu 16.04
- Docker
- NVIDIA Docker (We have not tested NVIDIA Docker2 yet.)
Download Docker Image
With the following command, download the Autoware 1.7.0 Kinetic version from Docker Hub.
$ docker pull autoware/autoware:1.7.0-kinetic
Preparation of Demo Data
Use the following command to make a directory to store the demo data, download and unpack the demo data.
$ mkdir ~/.autoware
$ cd ~/.autoware
$ wget http://db3.ertl.jp/autoware/sample_data/sample_moriyama_data.tar.gz
$ wget http://db3.ertl.jp/autoware/sample_data/sample_moriyama_150324.tar.gz
$ tar xf sample_moriyama_data.tar.gz
$ tar xf sample_moriyama_150324.tar.gz
$ rm sample_moriyama_data.tar.gz
$ rm sample_moriyama_150324.tar.gz
Preparing Script for Docker Container
With the following command, make a directory to store the shell script for starting the Docker container,
$ mkdir -p ~/Autoware/docker/generic
in the created directory, save the following contents as the file name run.sh.
#!/bin/sh

XSOCK=/tmp/.X11-unix
XAUTH=/home/$USER/.Xauthority
SHARED_DIR=/home/autoware/.autoware
HOST_DIR=/home/$USER/.autoware

nvidia-docker run \
    -it --rm \
    --volume=$XSOCK:$XSOCK:rw \
    --volume=$XAUTH:$XAUTH:rw \
    --volume=$HOST_DIR:$SHARED_DIR:rw \
    --env="XAUTHORITY=${XAUTH}" \
    --env="DISPLAY=${DISPLAY}" \
    -u autoware \
    --privileged -v /dev/bus/usb:/dev/bus/usb \
    --net=host \
    autoware/autoware:1.7.0-kinetic
You can also edit run.sh obtained by git clone.
Autoware Demo using Docker
Run Docker Container
Start the Docker container with the following command.
$ cd ~/Autoware/docker/generic
$ sh run.sh
Launch Runtime Manager
After the Docker container starts up, launch Runtime Manager with the following command.
$ cd Autoware/ros
$ ./run
The following operations are almost the same as GitHub’s Autoware_QuickStart_v1.1.pdf (https://github.com/CPFL/Autoware-Manuals/blob/master/en/Autoware_QuickStart_v1.1.pdf).
Play ROSBAG for a few seconds and Pause
In [Simulation] tab of Runtime Manager, specify following .bag file and press [Play] button, press [Pause] button after a few seconds.
“/home/autoware/.autoware/sample_moriyama_150324.bag”
Launching and Setting up RViz
Pressing [RViz] button in Runtime Manager to launch RViz.
Select [File]-[Open Config] in RViz.
Upon [Choose a file to open] dialog, select the following file, then press [Open].
“/home/autoware/Autoware/ros/src/.config/rviz/default.rviz”
Loading PointCloud and Vector map
In [Quick Start] tab of Runtime Manager, specify following .lanch file in the text field next to [Map] button and press the [Map] button.
“/home/autoware/Autoware/docs/quick_start/my_map.launch”
In [Simulation] tab, press [Pause] button and press [Pause] button after a few seconds.
Start Localization
In [QuickStart] tab, specify following .launch file in the text field next to [Localization] button, then press the [Localization] button.
“/home/autoware/Autoware/docs/quick_start/my_localization.launch”
In [Simulation] tab, press [Pause] button to restart ROSBAG replay.
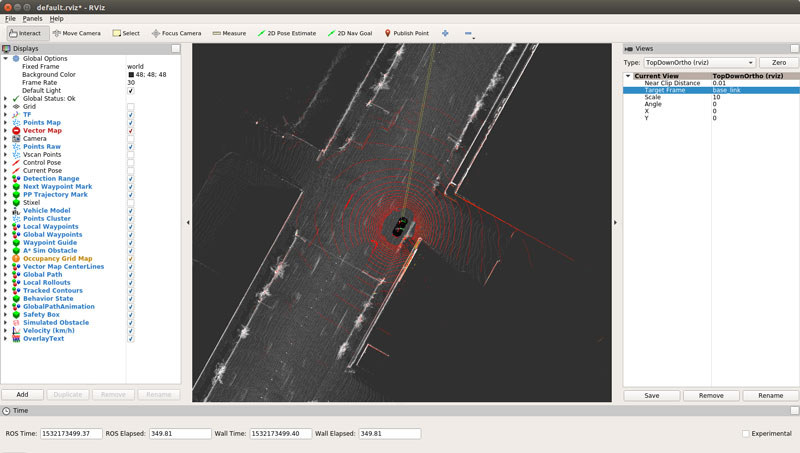
Display in RViz
In [Current View]-[Target Frame] of RViz’s [View] window, specify “base_link” and set [Type] to “TopDownOrtho” then press [Zero] button.
Other launch files
Other .launch files are in the “/home/autoware/Autoware/docs/quick_start/” directory.
[Sensing] “my_sensing.launch”
[Detection] “my_detection.launch”
[Mission Planning] “my_mission_planning.launch”
[Motion Planning] “my_motion_planning.launch”
Summary
We showed you how to set up Autoware and run demonstration using Docker.